Fix Your Bad Back : Build Permanent Strength at Home


Want to get faster but hate the track?
Speedwork doesn't have to be miserable. Our AI coach, Raye, knows hundreds of fun, effective interval sessions you can do anywhere, on your own terms. Try it out instantly with no sign-up. Ask Raye: 'What's a good fartlek session I can do around my local park?' Get instant speed session ideas.
Fix a Bad Back at Home: Build Permanent Strength
If you’ve ever felt that sudden, sharp "ping" while reaching for a bag of groceries or spent a Monday morning moving like a rusty robot, you aren’t alone. In fact, you’re in the majority. Back pain is one of those universal experiences that seems to unite us all at some point, but that doesn’t mean we have to just accept it...
Let our podcast hosts guide your recovery to a stronger back. Click play below
The truth is, our backs are incredible pieces of engineering. Imagine a structure that has to be stiff enough to hold up your head and torso, yet flexible enough to let you tie your shoes, swing a kettlebell, or twist to check your blind spot. It is a structure of contradictions: 33 vertebrae, 23 intervertebral discs, and a labyrinthine network of over 120 muscles. Usually, when things go wrong, it’s because the balance between "stiff and strong" and "mobile and bendy" has tipped too far in one direction.
The modern world doesn’t do our spines many favours. We spend a lot of time sitting, often leaning towards screens, which creates a "quiet" environment for the muscles that should be supporting us. When those muscles switch off, the stress shifts onto our discs and joints. The good news? You don’t need a fancy clinic or a PhD to fix this. You can build a back that feels solid and resilient right in your living room by following a structured, evidence-based approach.

FREE: THE "BULLETPROOF BACK" HOME MANUAL
Stop letting back pain keep you on the sidelines! Claim your 100% FREE eBook and discover the 5-minute "at-home" movements that fix your posture, kill the ache, and get you back on track to your goal weight.
Understanding the Team: Who Does What?
To fix a back, we need to know who the "players" are. We often talk about "the back" as if it’s one big muscle, but it’s actually a sophisticated, multi-layered system. We can split them into two main categories: the Movers and the Stabilisers . Training one without the other leads to the kind of imbalances that often invite injury.

Pace stuck in a training plateau?
If your times haven't dropped in months, you likely need a new stimulus. We've trained our AI coach, Raye, on elite programmes to help you break through. Jump in with no sign-up and ask, for instance: 'What is the best threshold session to improve my 10K pace?' Discover ways to break your plateau.
The Movers (The Heavy Lifters)
These are the large, superficial muscles you can see in the mirror. They generate power and produce big movements.
-
The Lats (Latissimus Dorsi): The widest muscle in the body. They connect your arms to your spine and pelvis. If they’re tight from desk work, they can pull your lower back into too much of an arch.
-
The Traps and Rhomboids: These sit between and over your shoulder blades. These are your "anti-slump" muscles. When they are strong, they keep your shoulders back and your chest open.
-
The Erector Spinae: These are the two vertical pillars running up either side of your spine. They are built for endurance, meaning they prefer steady, postural work rather than explosive power.
The Stabilisers (The Internal Support)
Deep beneath the big movers lies the "deep core" of the back. These don't move the trunk as much as they protect it.
-
The Multifidus: Think of these as the "velcro" of your spine. They bridge the gap between individual vertebrae. Research shows these are often the first muscles to switch off after a back injury, and they don't always start working again on their own without specific training.
-
The Quadratus Lumborum (QL): This sits deep in your lower back. If your glutes (your bum muscles) are a bit sleepy, the QL often tries to take over their job, leading to that familiar, chronic tightness.
The "Core" is a Cylinder, Not Just Abs
We’ve all heard that a "strong core" saves your back, but most people just think of the "six-pack" muscle. In reality, your core is a 360-degree pressure vessel or a cylinder:
-
The Roof: Your diaphragm (how you breathe).
-
The Floor: Your pelvic floor.
-
The Walls: Your obliques and deep stomach muscles.
-
The Rear: Those stabilisers like the Multifidus and Erector Spinae.
True stability happens when all sides of this cylinder contract together to increase internal pressure. Strengthening the back without engaging the front of the core is like trying to support a house with only one wall.

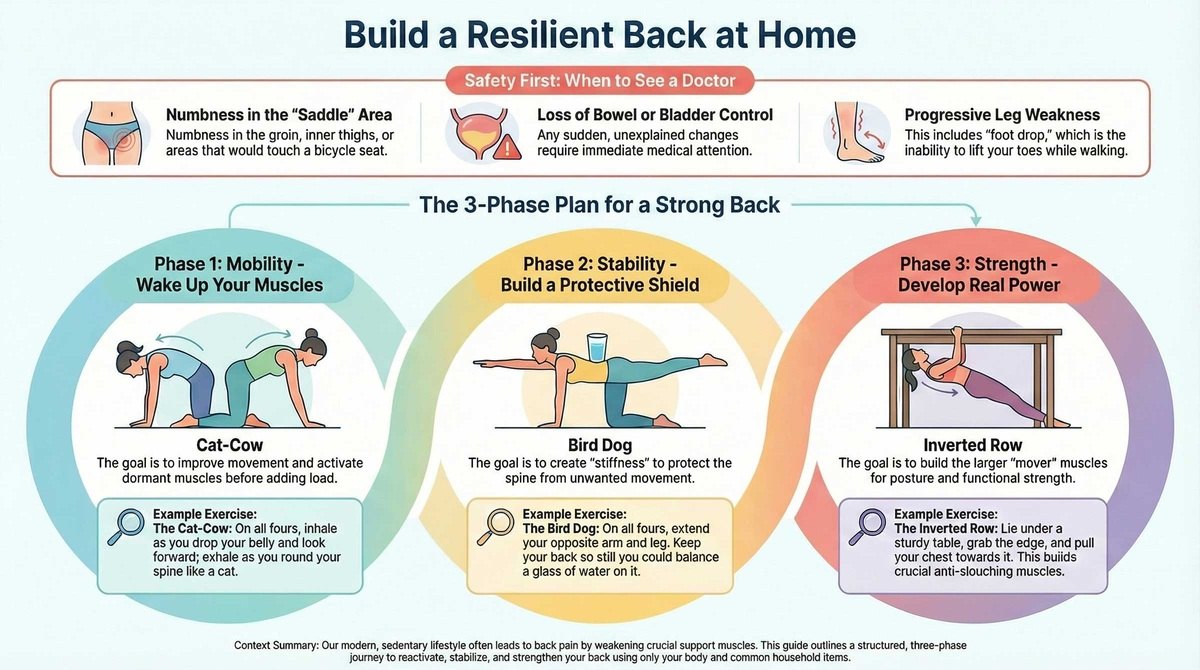
Safety First: Knowing When to Step Back
Before we dive into any exercise, we must talk about "Red Flags." While most back pain is just a result of muscles being grumpy, occasionally it’s a sign of something that needs professional medical attention.
When to See a Doctor Immediately:
-
Saddle Anesthesia: Numbness in the groin, inner thighs, or the bits that would touch a bike seat.
-
Loss of Control: Any sudden changes in bowel or bladder control (incontinence or retention).
-
Neurological Deficits: Significant weakness in the legs or "foot drop" (inability to lift your toes while walking).
-
Non-Mechanical Pain: Pain that is constant and doesn't change regardless of whether you sit, stand, or lie down.
-
Trauma: Pain following a significant fall or impact.
Flexion vs. Extension Personalities
Every back injury has a "personality."
-
Extension Intolerant: You hate leaning back or standing for long periods. This is common in conditions like Spinal Stenosis.
-
Flexion Intolerant: You hate bending forward or sitting. This is often related to disc issues.
The Golden Rule: If a movement causes sharp, piercing pain or makes pain shoot down your leg, stop. We want the "dull ache" of a muscle working, not the "stabbing protest" of a joint or nerve.

5 Simple Exercises to Build Back Resilience
These moves transition from mobility to stability and strength. They require no equipment and are constructed to protect the spine while training the muscles that support it.
1. The Cat-Cow (Mobility)
This serves as a "morning oil change" for the spine, helping to lubricate the joints and reduce stiffness.
-
The Movement: On all fours, inhale as you drop your belly and look forward (Cow). Exhale as you press through your palms and round your spine toward the ceiling (Cat).
-
Key Insight: Focus on moving one vertebra at a time, like a wave, rather than moving your back as one stiff block.
2. The Glute Bridge (Activation)
The glutes are the primary shock absorbers for the lower back. If they are weak, the lower back muscles are forced to compensate and become painful.
-
The Movement: Lie on your back and drive through your heels to lift your hips until you’re in a straight line from shoulders to knees. Squeeze your glutes at the top.
-
Key Insight: Avoid arching your back at the top to get higher. The lift should come from the hips, not the spine.
3. The Bird Dog (Stability)
The "gold standard" for back health. It trains the spine to remain stable while the limbs move.
-
The Movement: On all fours, extend the opposite arm and leg simultaneously until they are parallel to the floor. Hold for 5–10 seconds.
-
Key Insight: Imagine balancing a glass of water on your lower back. Reach for the walls, not the ceiling, to lengthen the spine.
4. The Side Plank (Lateral Stability)
This targets the QL and side obliques without placing a heavy load on the spine, which is vital for walking stability.
-
The Movement: Prop yourself up on your elbow and feet (or knees for an easier version) until your body forms a straight line.
-
Key Insight: If this is too tough, bend your knees to 90 degrees and lift from the knees instead of the feet.
5. The Dead Bug (Core Integration)
This teaches you to keep your spine "braced" while your arms and legs are moving.
-
The Movement: Lie on your back with arms and legs in the air. Lower the opposite arm and leg slowly towards the floor.
-
Key Insight: Only lower your limbs as far as you can while keeping your lower back glued to the floor. If your back arches, the core has failed.
Additional Strength Moves
-
Inverted Row: Lie under a sturdy table, grab the edge, and pull your chest up. Excellent for your posture.
-
Bodyweight Good Morning: Hands behind head, knees soft. Push your hips back as if closing a door with your bum. Squeeze your glutes to stand.
-
Prone Y-T-W: Lie face down and lift your arms to form these letters, keeping thumbs to the ceiling.
The 4-Week Permanent Strength Programme
We’ve structured this into three phases: Awareness , Integration , and Resilience . We use "Progressive Overload," slowly increasing the challenge so your body gets stronger.
The Rules of the Road
-
Sets/Reps: A set is a "round," and reps are the movements within that round.
-
Tempo: Use a 3-1-3 tempo (3 seconds down, 1-second pause, 3 seconds up) to make the muscles work harder.
-
Hurt vs. Harm: Mild muscle discomfort is acceptable, but piercing pain is not.
Week 1: The Awareness Phase
Goal: Re-establishing the connection and teaching the brain to talk to the stabilisers.
-
Daily: Mobility Flossing (5-10 mins)
-
Mon/Wed/Fri: The Foundation Session:
-
Cat-Cow: 2 Sets | 10 Cycles (Move slowly)
-
Pelvic Tilts: 3 Sets | 15 Reps (Find "neutral")
-
Glute Bridge: 3 Sets | 10 Reps (3s squeeze at top)
-
Bird Dog (Base): 3 Sets | 5 per side (5s hold)
-
Dead Bug (Legs only): 3 Sets | 8 per side (Back glued to floor)
-
Week 2: The Integration Phase
Goal: Building the cylinder and anti-rotation strength.
-
Daily: Mobility Flossing (5-10 mins)
-
Mon/Wed/Fri: The Integration Session:
-
T-Spine Open Books: 2 Sets | 8 per side
-
Bird Dog (Full): 3 Sets | 8 per side (No wobbling)
-
Side Plank (Knees): 3 Sets | 20-30 seconds
-
Prone Y-T-W: 2 Sets | 10 reps total
-
Bodyweight Hinge: 3 Sets | 12 reps (Focus on hamstrings)
-
Week 3: The Strength Phase
Goal: Absolute stability and pulling power.
-
Daily: Mobility Flossing (5-10 mins)
-
Mon/Wed/Fri: The Strength Session:
-
Single-Leg Bridge: 3 Sets | 8 per side
-
Inverted Row: 3 Sets | 8-10 reps (Slow tempo)
-
Full Side Plank: 3 Sets | 30-45 seconds
-
Dead Bug (Full): 3 Sets | 10 per side
-
Good Mornings: 3 Sets | 15 reps (Chest proud)
-
Week 4: The Resilience Phase
Goal: Hardening the armour and testing endurance.
-
Daily: Mobility Flossing (5-10 mins)
-
Mon/Wed/Fri: The Resilience Session:
-
Bird Dog (Squares): 3 Sets | 6 per side (Draw small squares with limbs)
-
Inverted Row (Tempo): 3 Sets | 10-12 reps (4s lowering phase)
-
Wall Sit: 3 Sets | 45-60 seconds (Back flat against wall)
-
Prone Cobra: 3 Sets | 10 reps (5s hold)
-
Single-Leg Hinge: 3 Sets | 8 per side (The ultimate balance test)
-
Top 10 Tips
Prioritise Movement Quality
Never sacrifice form for more reps. Precision is what protects you.
Walk More
Walking is rhythmic loading that pumps nutrients into your spinal discs.
The "Next Posture"
Don't worry about "perfect" sitting; just change positions every 30 minutes.
Engage Your Glutes
Your bum is the bodyguard of your back. Make sure it's working.
Breathe with Your Diaphragm
Proper breathing creates the internal pressure needed for stability.
Avoid "Neck Cranking"
During floor exercises, look at the floor, not the wall. Keep your neck neutral.
Squeeze, Don't Arch
In bridges or lifts, focus on muscle contraction rather than how high you can go.
Differentiate "Hurt" from "Harm"
Learn to embrace muscle fatigue but respect joint or nerve pain.
Hydrate and Sleep
Recovery is when the actual strengthening happens. Give your body resources.
Avoid the Superman if in Pain
Use the Bird Dog instead to get the benefits without the massive compressive load.
Common Mistakes to Avoid
-
Shrugging: During rows or arm lifts, don't let your shoulders creep up to your ears. Keep them "in your back pockets."
-
The "No Pain, No Gain" Myth: With your back, if it hurts, stop. Ignoring signals can lead to structural failure.
-
Incomplete Glute Drive: If you don't feel your bum working in a bridge, you're likely using your back. Tap your glutes to "remind" them to fire.
FIX YOUR BACK, RECLAIM YOUR LIFE (FOR FREE!)
You can't lose weight if you can't move. Download our FREE Back Health Masterclass to learn the "secret" core-strengthening hacks that protect your spine and make every workout feel effortless. Zero cost—Instant Download!
The Sundried Roundup
What are the pros doing? The professionals focus on "movement quality" over everything else. They don’t just "do" a Bird Dog; they do it with absolute precision. They know that a powerful engine is useless without a strong chassis.
How can I build this into my life? Try "habit stacking." Do your Cat-Cows while the kettle is boiling. Do your Pelvic Tilts while lying in bed before you get up. The best programme is the one you actually do.
The budget approach? You don’t need a penny. Your body weight, a sturdy table, and the floor are your only tools. Focus on the Bird Dog and Glute Bridge—they are free and incredibly effective.
Middle of the road approach? Invest in a set of resistance bands. They allow you to add "weight" to your rows and Good Mornings without needing a full home gym.
Pushed for time? Focus on the "Big 3": The Bird Dog, the Side Plank, and the Modified Curl-up. They provide the most "bang for your buck" for spinal stability in just 10 minutes.
I have 3 hours a week, what can I do? Split this into three 1-hour sessions. Spend 15 minutes on mobility, 15 minutes on core stability, and 30 minutes on strength (Inverted Rows and Hinging).
I can fit in training 7 days a week. How can I maximise this? Don't do heavy strength every day. Alternate "Strength" days with "Active Recovery" days—long walks are perfect for a back as they provide a gentle, rhythmic load.
The premium approach? Look into suspension trainers (like a TRX) for your home. Combine this with a high-quality foam roller and a protein-rich diet to support muscle repair.
Building a resilient back isn't about one heroic workout; it’s about the small, consistent things you do every day. Start today, move mindfully, and your back will thank you.


