Scarpa Manta Tech Review : When to Switch to B2 Boots

Scarpa Manta Tech GTX Review: When Is It Time to Switch to B2 Boots?
So, you’re heading to the mountains and you’re thinking you’ll need mountaineering boots, right? Well, that was exactly my first thought, and it’s a question you might be asking yourself too. When do you actually need to pull the trigger on a pair of proper mountaineering boots?
Maybe you’re planning to go climbing in the summer in Snowdonia, or perhaps you want to add a few extra-rugged hikes to your repertoire. Where do you even start? Do you get a category B1 or a B2? When does a four-season mountaineering boot actually become a necessity rather than just a "nice to have"?
Like any outdoor activity, the moment you start drilling down into the technical side of the sport, it opens up a whole new world of questions, jargon, and "dos and don’ts." You might be thinking, "I love climbing and I love hiking," and your first instinct is to rush out and buy the flashiest pair of B2 mountaineering boots available. But before you do that, it’s worth asking: when am I actually going to use them? Am I really going to be climbing in all four seasons?
Listen on the go. Click play below
What I’ve found is that a heavy-duty four-season boot might not be the most comfortable thing to wear in the height of summer. Over the last week, I’ve been putting my own fitness to the test, heading out for seven days of daily climbing to see what kind of gains I could make. I’ve been testing out the Scarpa Manta Tech B2 boots , along with some high-spec trekking poles and crampons, to see where the limit really lies.
When you’re on holiday, you don’t have to throw your fitness away. If you prefer going up rather than down—climbing up rather than slipping back—let’s find out some of the answers. I’ve been hiking in the mountains for years, and for the most part, I’ve stuck to standard "B0" all-round hiking boots. They’ve served me well, but as my climbing has intensified, I realised I was missing out on a whole technical world. Maybe it’s time for you to step up the game, too.
The Gear Under the Microscope
For this trip, I wasn't just walking; I was testing a specific "technical system." Here is the kit I’ve been using, which you’ll see in action in my latest video.
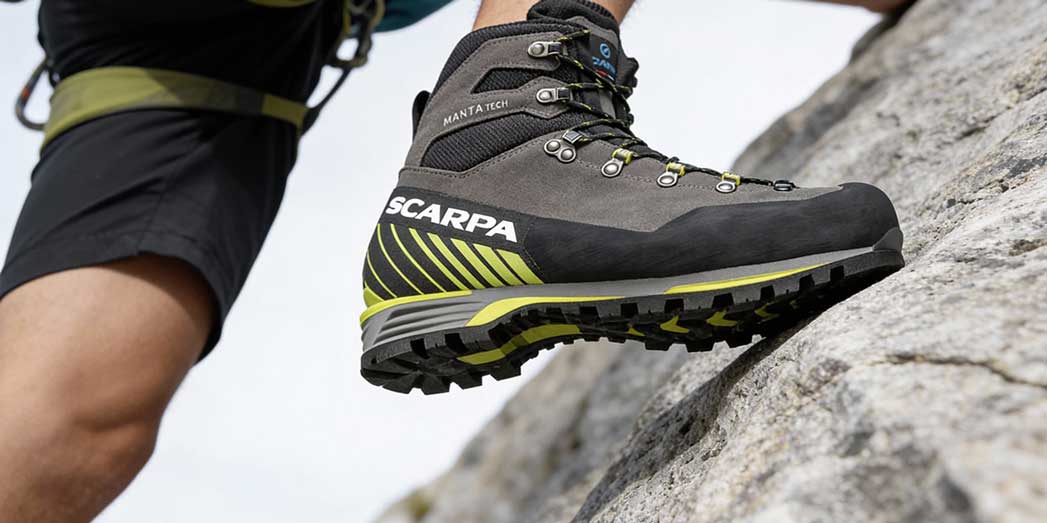
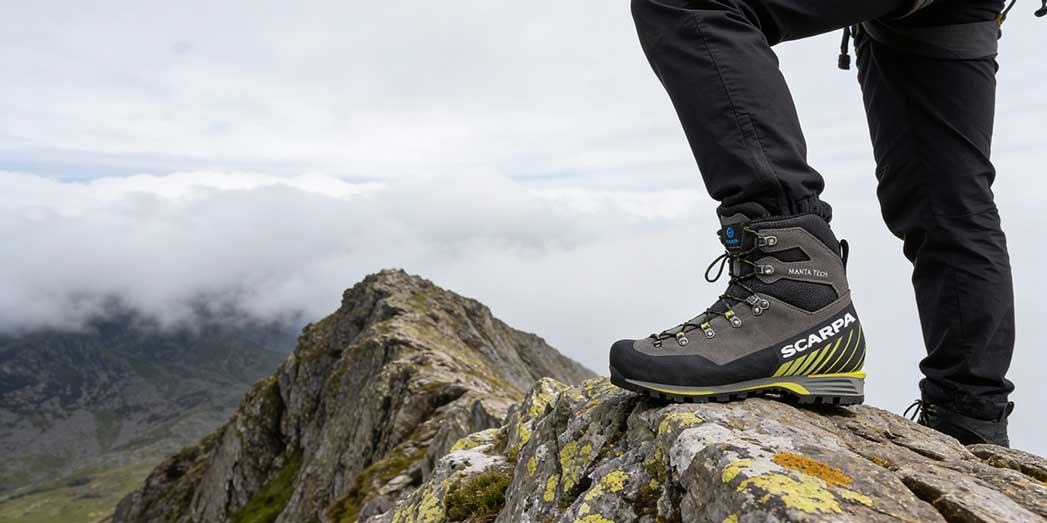
Scarpa Manta Tech GTX Mountaineering Boots
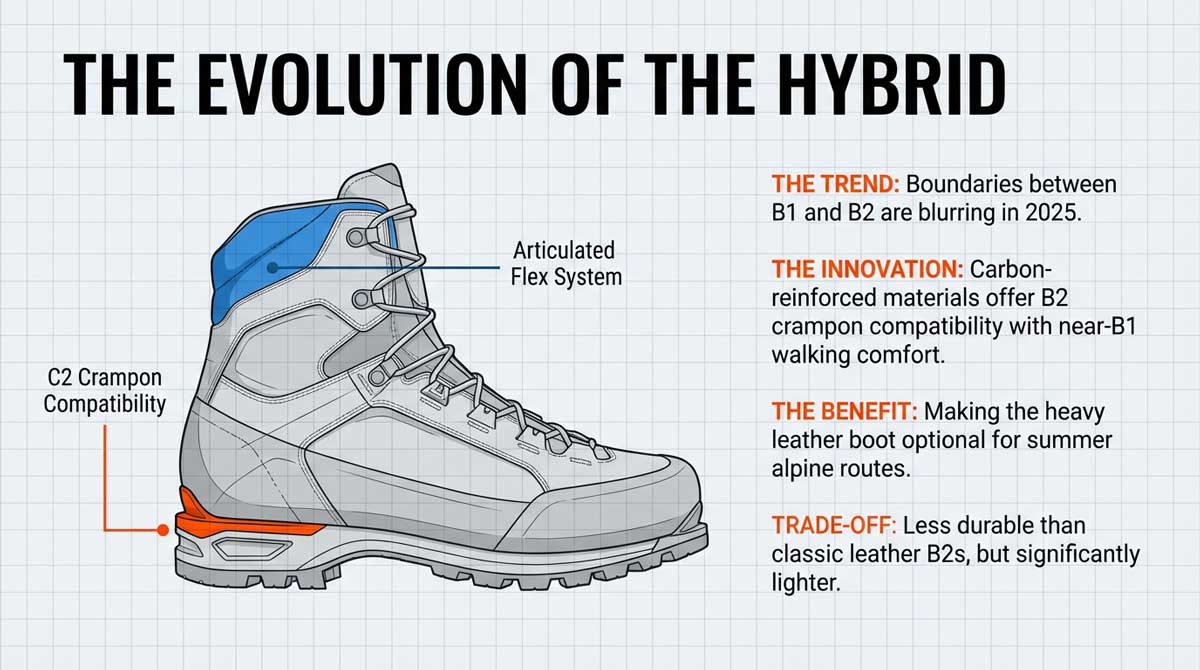
These are what we call a "crossover" boot. They’re built with 3mm Suede Perwanger leather (which is incredibly tough) and have a full rubber rand to stop rocks from chewing up the sides. Inside, they’ve got a GORE-TEX Insulated Comfort lining, which keeps you dry and, more importantly, warm when you’re high up or in the snow. They are B2 rated, meaning they have a stiff heel for a certain type of crampon but enough flex in the toe to make walking feel somewhat natural.
Petzl Vasak Leverlock Universel Crampons
These are classic 12-point crampons. They’re designed for general mountaineering and glacier travel. What’s clever about them is the "Leverlock" system—it’s modular, so you can swap the front attachments to fit different types of boots. They also have "Antisnow" plates, which are a lifesaver; they stop snow from sticking to the bottom of your feet and turning you into a human ice-skate.
Black Diamond Pursuit FLZ Trekking Poles
I used these in the Black and Foam Green colourway. They use a "Z-Pole" design, so they fold down tiny but snap into place instantly. They have ergonomic cork grips that are brilliant for wicking away sweat, and the FlickLock adjustments mean you can change the height in seconds when the path gets steep.
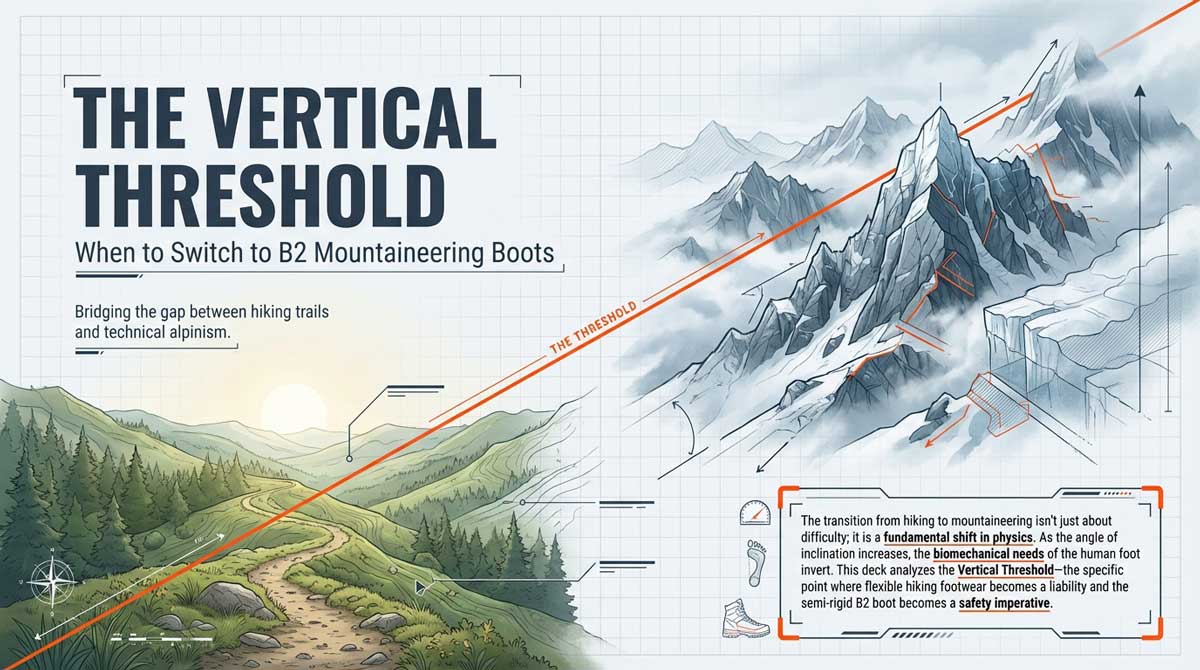
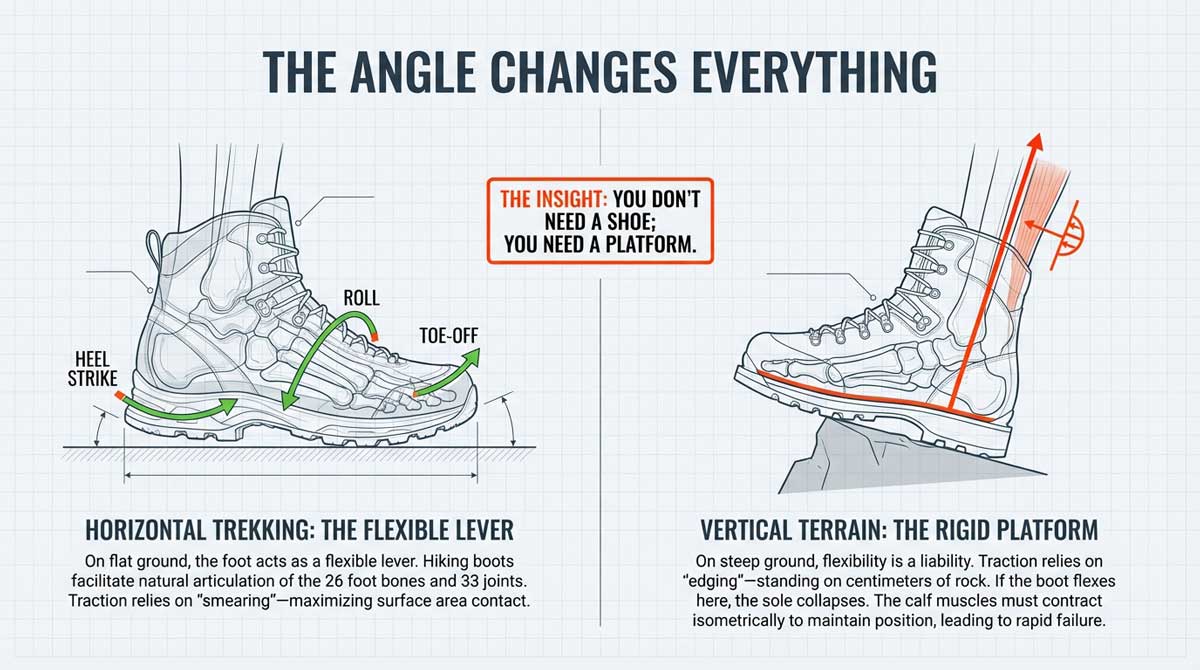
Why the Boot Matters: The Physics of Your Feet
When we hike on flat or rolling trails, our feet act like flexible levers. You strike with your heel, roll through the middle, and push off with your toes. Hiking boots are designed to help this; they are bouncy, flexible, and let your 26 foot bones move naturally.
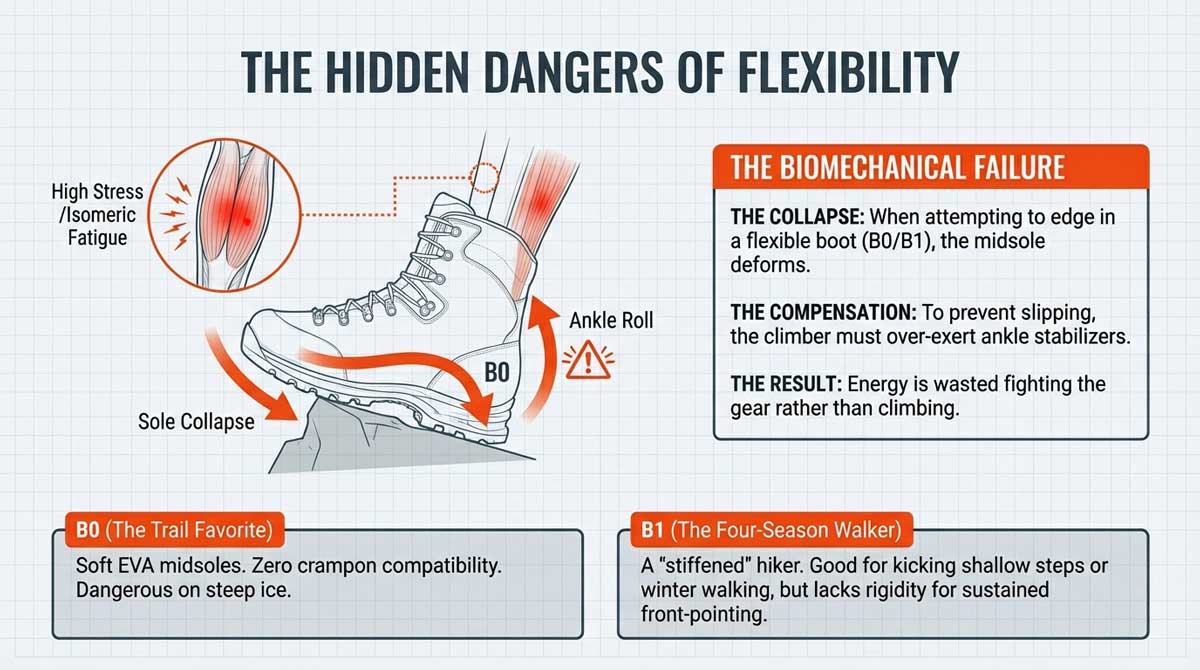
But as soon as the ground tilts up and turns into snow, ice, or vertical rock, everything changes. On steep ground, you don't want a flexible foot. You want a rigid platform. Imagine standing on a tiny ledge of rock only a centimetre wide. If your boot is soft, the sole will collapse, and your calf muscles have to work like crazy to keep you from slipping. This leads to that "calf burn" we all know and hate.
A mountaineering boot is essentially a splint for your foot. It has a rigid "shank" inside the sole that takes the weight for you. This allows you to stand on a tiny edge while your ankle and calf stay relatively relaxed. It’s not just about gear; it’s about using physics to save your energy for the summit.
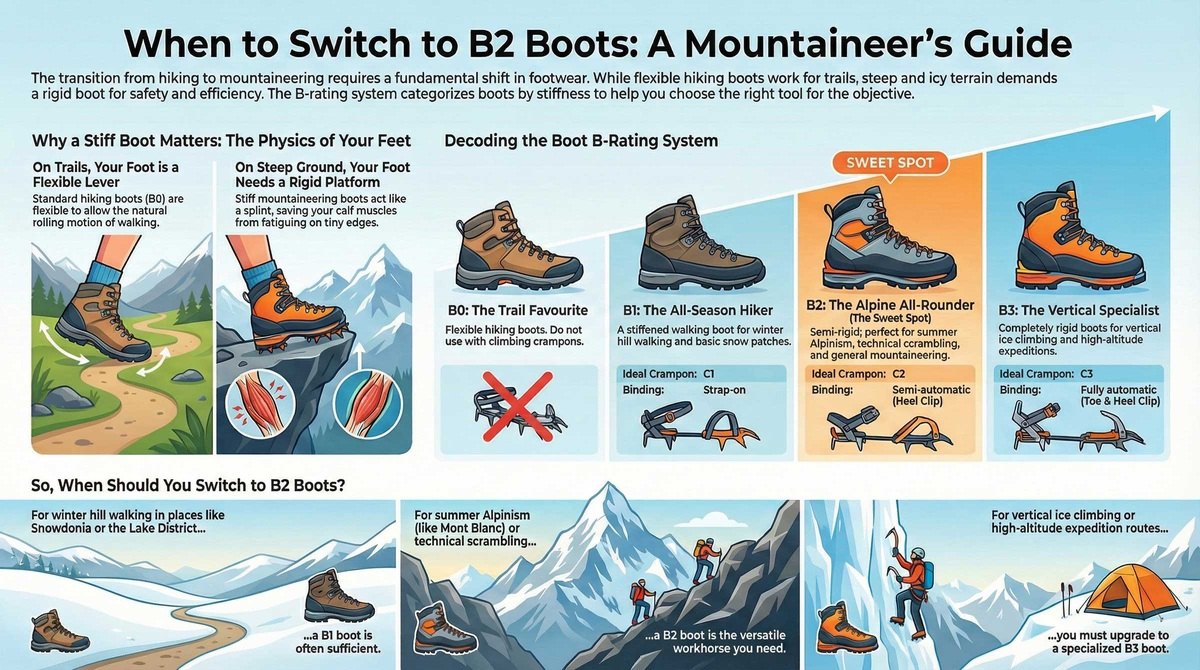
Decoding the B-Rating System
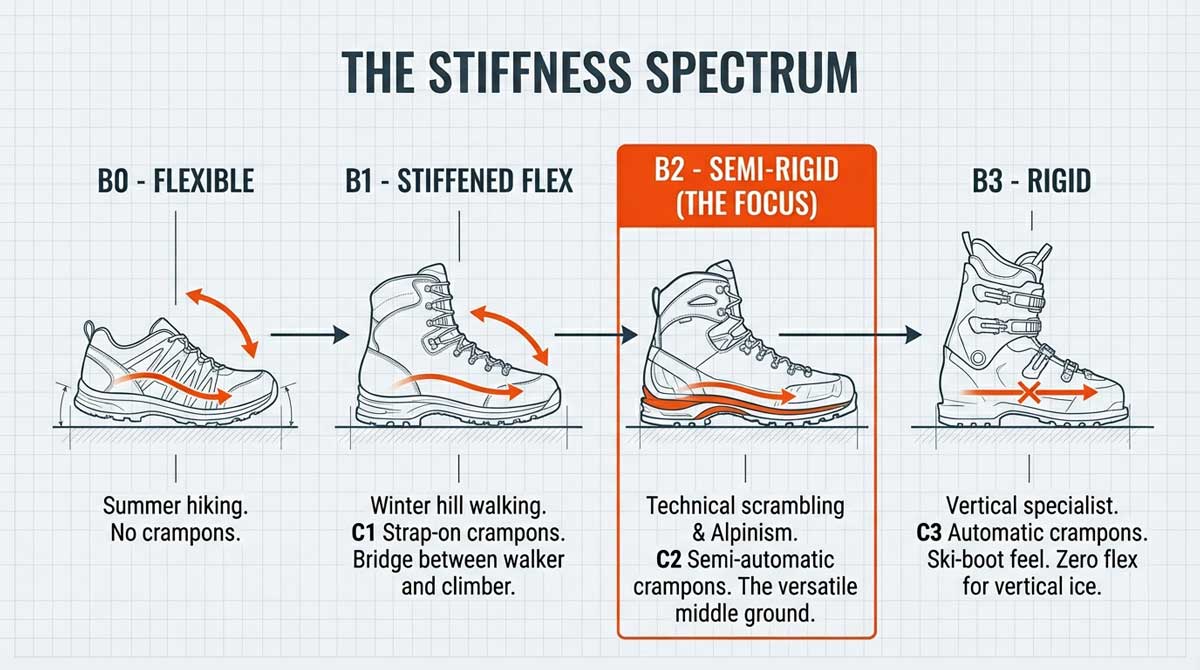
If you’ve been looking at boots, you’ve probably seen the terms B0, B1, B2, and B3. It sounds complicated, but it’s actually a very simple scale of stiffness.
B0: The Trail Favourite
These are your standard hiking boots. They are flexible and comfortable right out of the box.
-
Best for: Summer hiking, well-maintained trails, and general fitness walking.
-
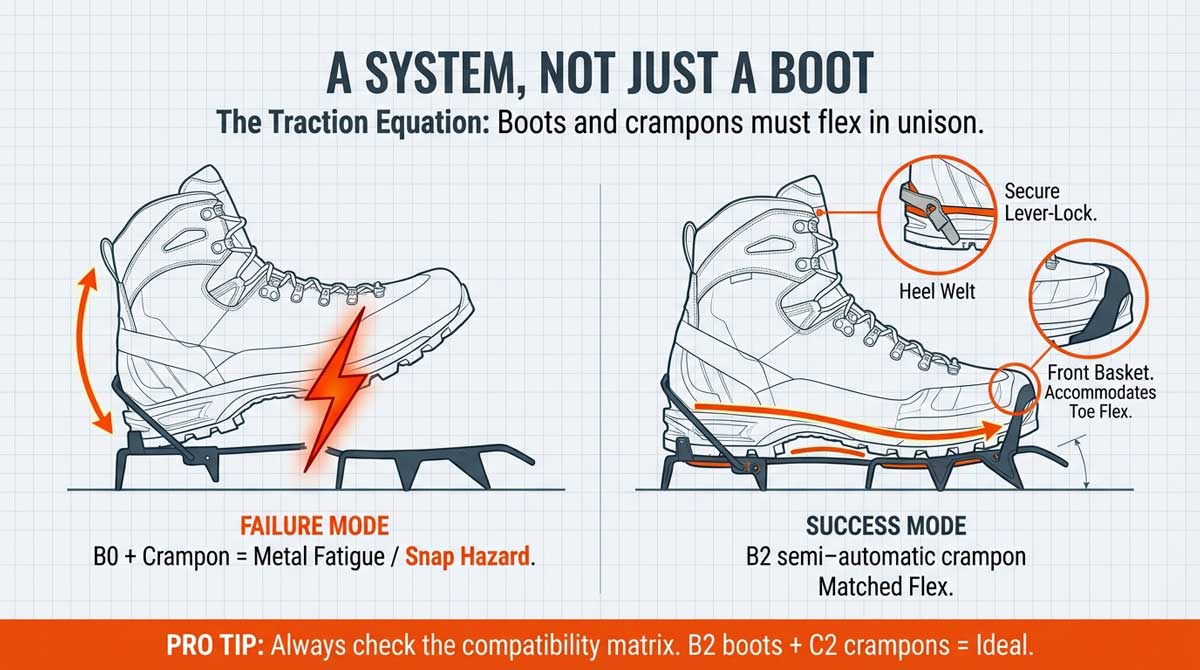
Crampons? No. Do not put climbing crampons on B0 boots. The boot will flex, the crampon won't, and it will eventually snap or fall off.
B1: The All-Season Hiker
A B1 boot is like a "stiffened" hiking boot. It’s the bridge between a walker and a climber.
-
Best for: Winter hill walking in places like the Lake District or the lower Scottish peaks.
-
Crampons? You can use "C1" strap-on crampons for crossing basic snow patches.
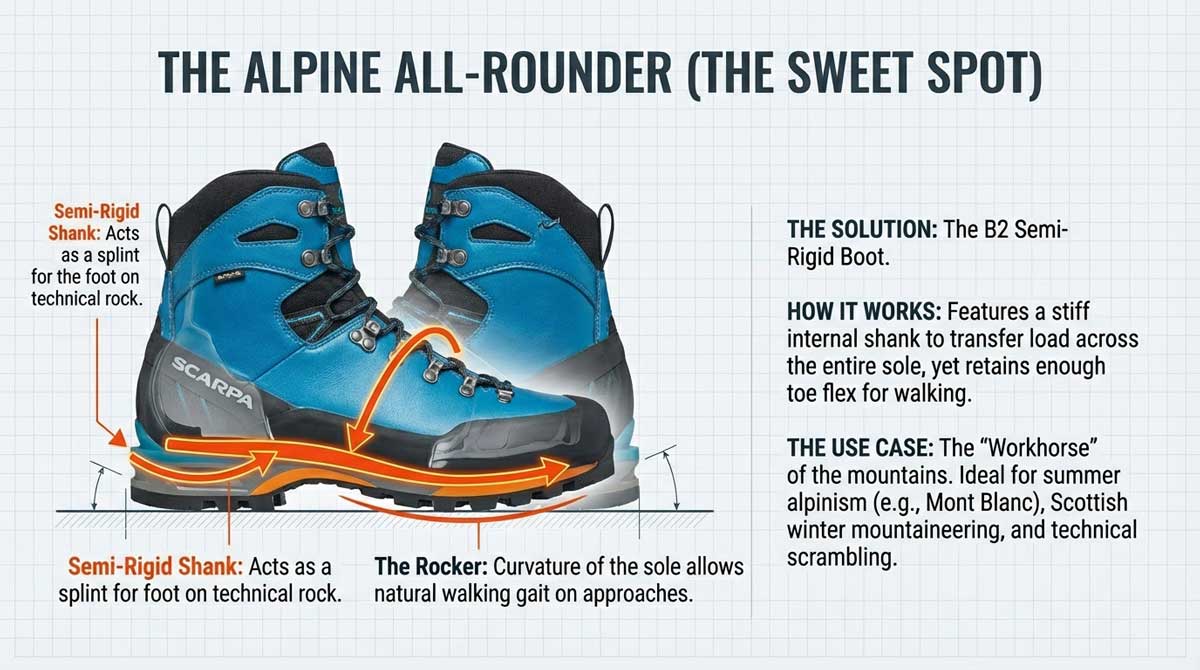
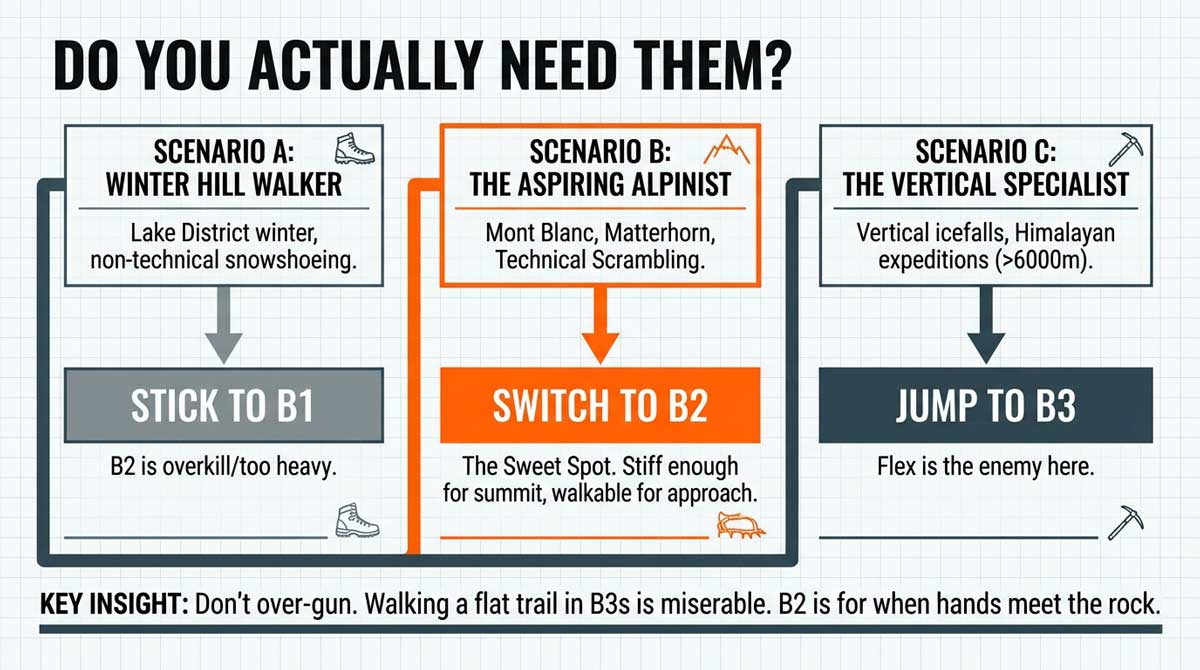
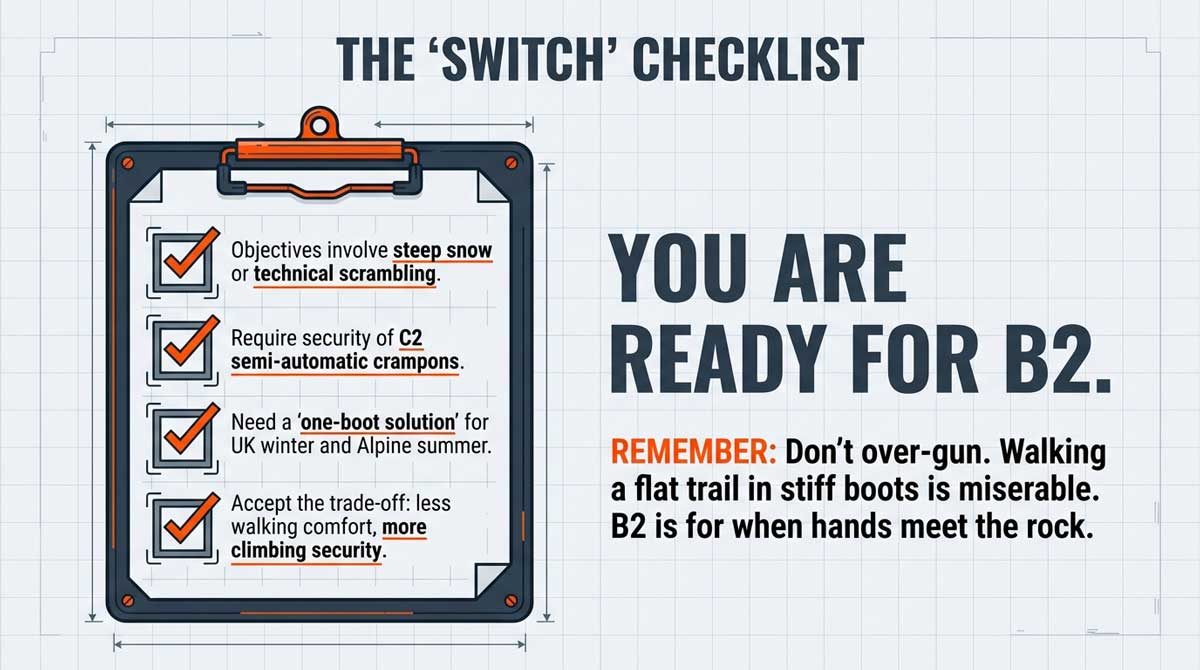
B2: The Alpine All-Rounder (The Sweet Spot)
This is where the Scarpa Manta Tech sits. These boots are "semi-rigid." They are stiff enough to climb technical rock and ice, but they have a slight curve in the sole (called a rocker) so you can still walk to the mountain without feeling like you're wearing concrete blocks.
-
Best for: Summer Alpinism, winter mountaineering, and technical scrambling.
-
Crampons? They are designed to work perfectly with "C2" semi-automatic crampons (the ones with a clip at the heel).
B3: The Vertical Specialist
These are completely rigid. You cannot bend the sole even if you try.
-
Best for: Vertical ice climbing and high-altitude expeditions (like the Himalayas).
-
Crampons? They take "C3" automatic crampons which lock onto the toe and heel. They feel like walking in ski boots—not fun for long hikes, but amazing on ice.
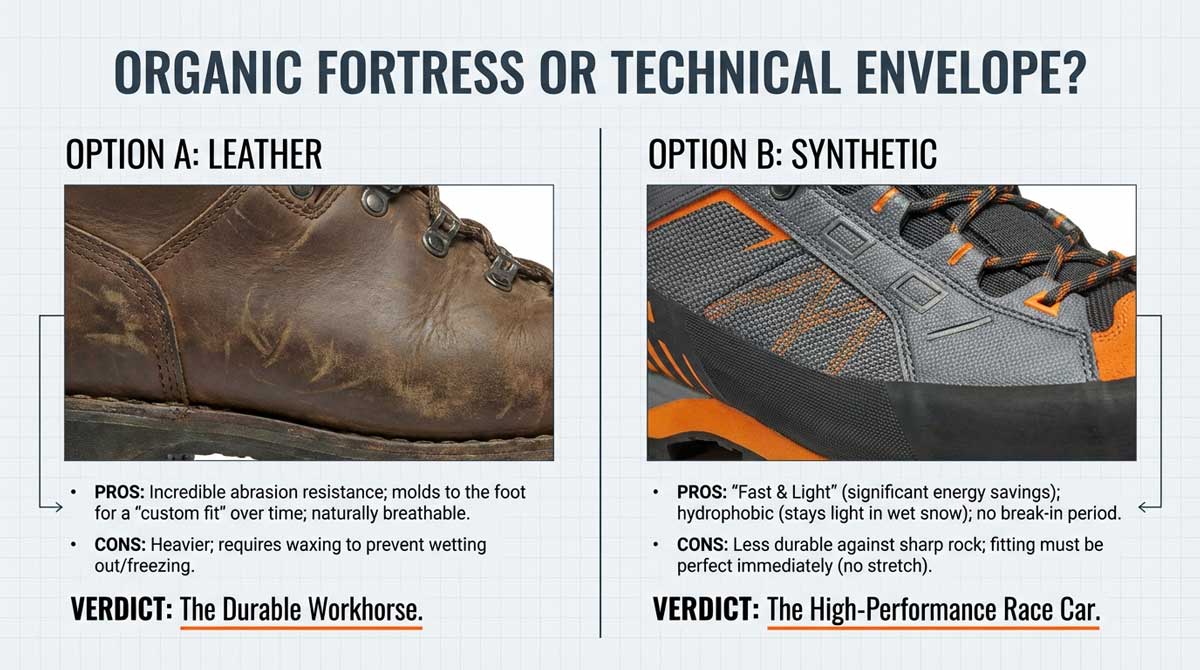
Leather vs. Synthetic: Which is Better?
This is a classic debate in the climbing world.
Leather boots (like the Manta Tech) are the "organic fortresses." Leather is incredibly tough. If you jam your foot into a crack in the rock, the leather might scuff, but it won't tear. The best part? Over time, leather moulds to the shape of your foot, giving you a custom fit. The downside is that they are heavier and need a bit of love (waxing and cleaning) to stay waterproof.
Synthetic boots are the "fast and light" option. They are often made of materials like Kevlar or Cordura. They are much lighter, which is great for saving energy, but they don't have the same "mould-to-your-foot" magic as leather. They also tend to wear out a bit faster if you're doing a lot of rugged rock work.
The Secret to a Good Fit: No More Blisters
A mountaineering boot that doesn’t fit is a disaster. Because the soles are stiff, the boot won't "break in" the way a trainer does. If the boot is rubbing, it’s going to keep rubbing.
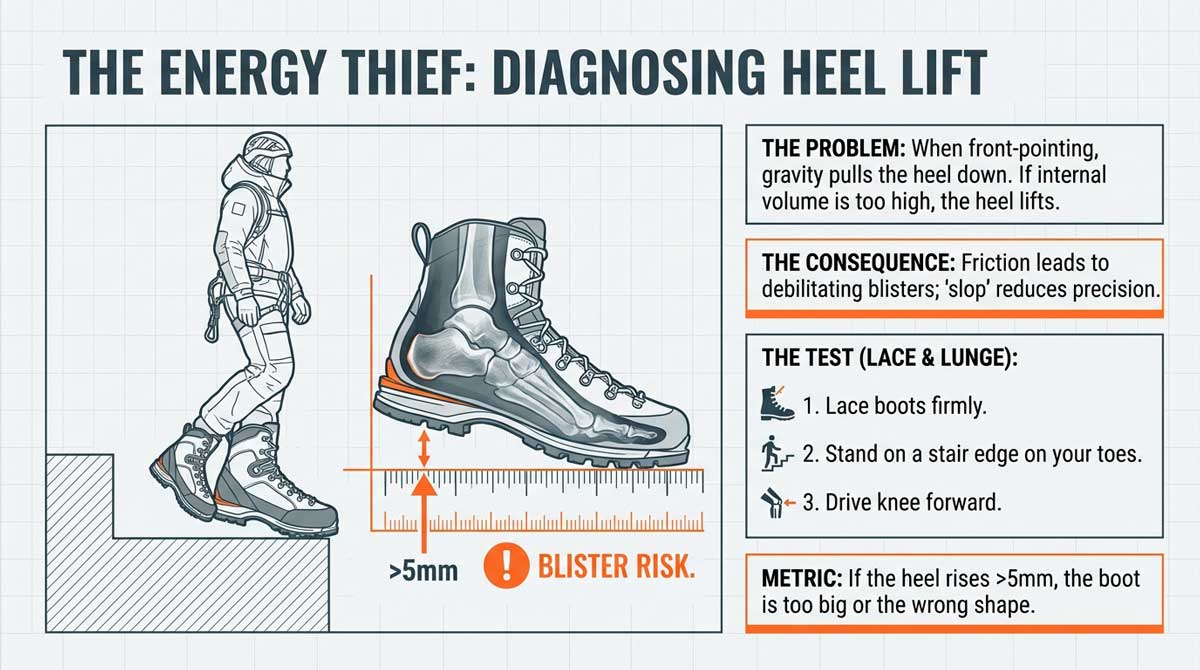
The Heel Lift Test
This is the most important test. When you're climbing up a steep slope, you’ll be on your toes. If your heel lifts up inside the boot, you’re going to get a blister in about twenty minutes. The Test: Lace the boots up firmly, stand on a stair-step with just your toes, and lean forward. If your heel lifts more than a few millimetres, the boot is too big for your foot shape.
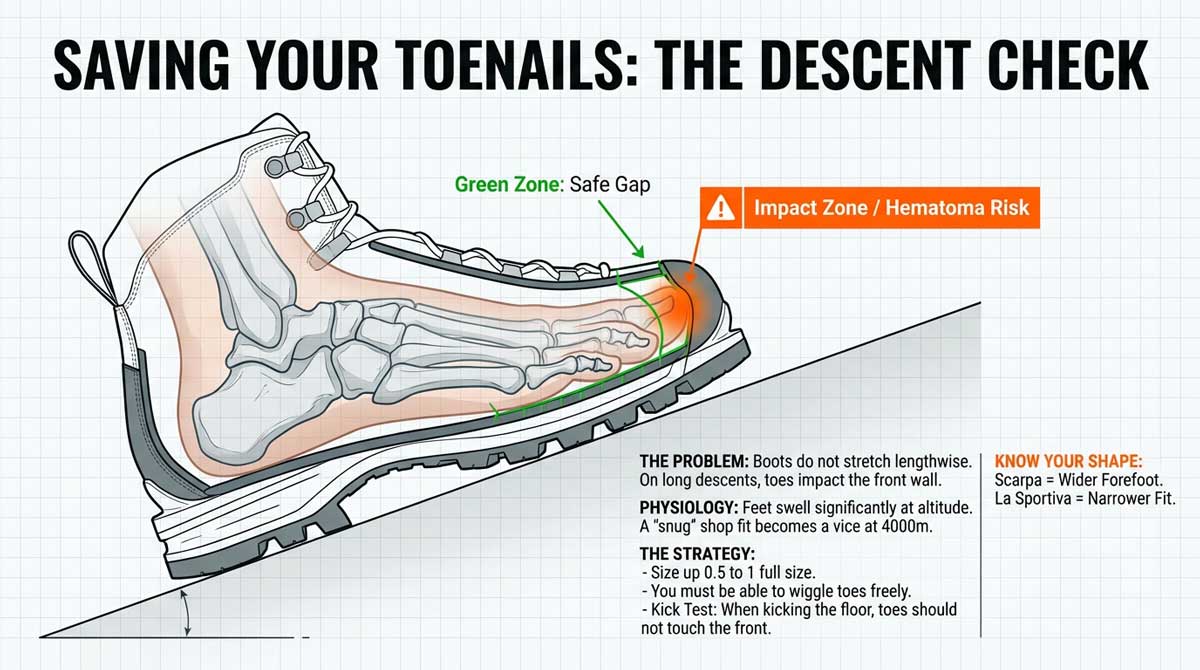
The "Toe Bang"
While the heel needs to be snug, your toes need room to wiggle. When you're walking back down the mountain after a long day, your feet will swell. If your toes hit the front of the boot, you’ll end up with bruised or missing toenails. The Strategy: Always size up slightly. I usually go half a size or even a full size larger than my everyday shoes. You should be able to kick the floor without your toes touching the front.
Caring for Your Investment
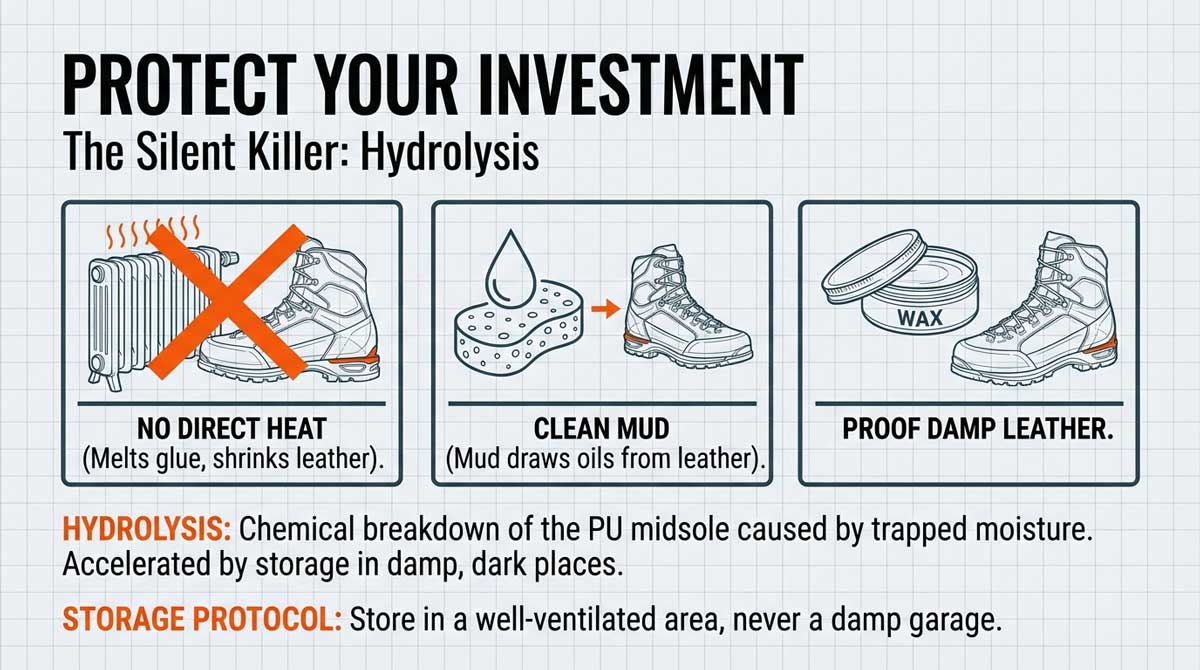
Mountaineering boots aren't cheap, so you want them to last. The biggest enemy of a boot isn't the mountain—it’s your garage.
-
Avoid the Heat: Never dry your boots next to a radiator or a fire. It makes the leather brittle and can even melt the glue that holds the sole on.
-
Clean the Mud: Mud sucks the natural oils out of leather. Give them a quick rinse and a scrub after every trip.
-
Store them Dry: If you store them while they're damp, the internal foam can start to break down (a process called hydrolysis). Keep them in a well-ventilated spot.
The Sundried Roundup
What are the pros doing?
The pros are moving towards "Fast and Light." They often use the lightest B2 or B3 synthetic boots they can find to save energy. However, for their "workhorse" boots—the ones they use day in and day out—many still rely on classic leather B2s like the Scarpa Manta because they just don't quit.
How can I build this into my life?
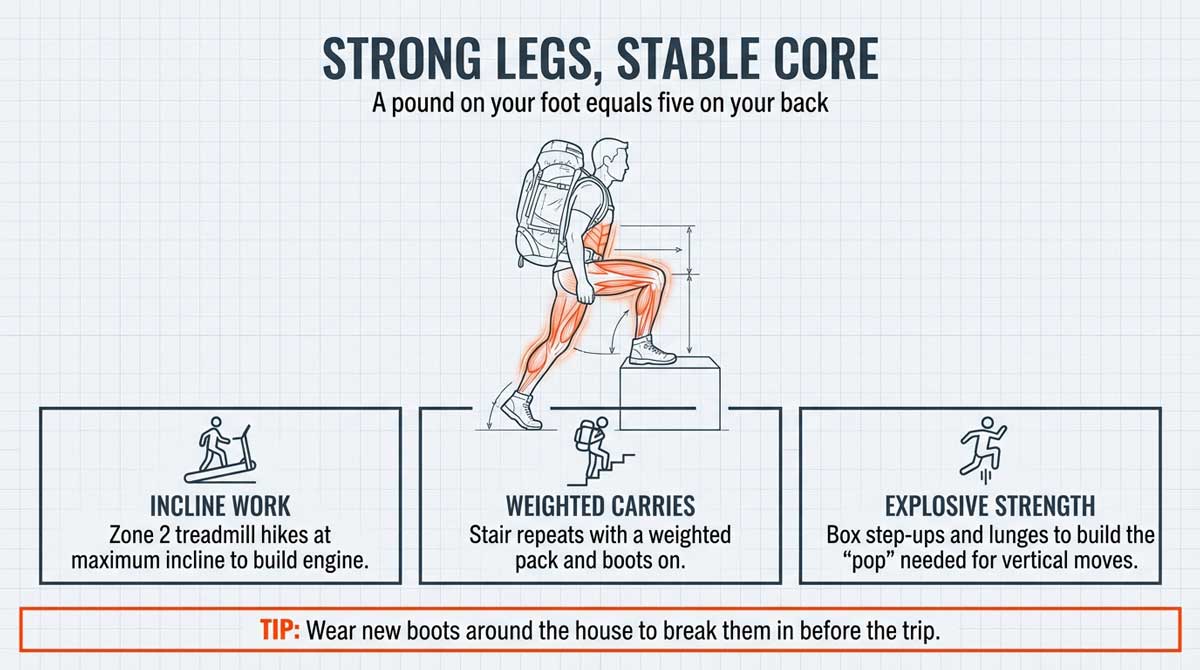
Mountaineering is the ultimate functional fitness. It's not just about cardio; it’s about stability, core strength, and leg endurance. Start by incorporating "incline" work on the treadmill or finding the steepest hills in your local area to get your legs used to the vertical load.
The budget approach?
If you're just starting, don't buy B3 boots. Look for a high-quality B1 boot or a "previous season" B2 model. You can often find great deals on the Manta Tech when the new colours come out. Also, consider renting for your first weekend to make sure you actually enjoy the vertical life before committing.
Middle of the road approach, I am serious but not all in yet?
Invest in a solid pair of B2 boots like the Scarpa Manta Tech. They are the most versatile option. You can use them for winter walking in the UK and for your first trips to the Alps. They are the only boot many climbers ever actually need.
Pushed for time, how can I keep up?
If you can't get to the mountains, focus on "weighted carries." Put your boots on, grab your trekking poles, and walk up and down stairs with a weighted backpack. It’s the best way to keep those specific climbing muscles primed.
I have 3 hours a week, what can I do?
Focus on high-intensity step-ups and lunges. Three hours of focused leg and core work will give you the "pop" you need when you finally get onto the rock. Spend 2 hours on strength and 1 hour on a steep incline walk.
I can fit in training 7 days a week. How can I maximise this?
Vary your intensity. Mix long, slow "zone 2" hikes with shorter, intense sessions of stair climbing. Use one or two days for "active recovery," like a flat walk to keep the blood flowing without overtaxing your joints.
The premium approach? I want to chuck everything at this.
Go for a full "system." Get the Scarpa Manta Techs for your general work, but also look at a pair of ultra-light synthetic B3 boots for technical ice days. Combine this with carbon fibre trekking poles and a tailored mountaineering strength programme.
Top 10 Tips
Don’t wait for the mountain
Wear your new boots around the house and on local walks first. You need to get used to the weight.
Trim your toenails
Seriously. Long nails and stiff boots on a descent are a painful combination.
Use the right socks
A thick, wool-blend mountaineering sock is essential for padding and moisture-wicking.
The Lacing Trick
Lace the bottom half comfortably, but lock the ankle tightly to prevent heel lift.
Poles are your friends
They take up to 25% of the load off your knees on the way down.
Check compatibility
Always make sure your crampons are rated for your boots (C2 crampons for B2 boots).
Practice "flat-footing"
When using crampons, you want as many points in the ice as possible.
Hydrate your leather
Use a water-based proofer to keep the leather supple and waterproof.
Temperature matters
Remember that your feet will swell in the heat and shrink in the cold. Account for this.
Listen to your feet
If you feel a "hot spot," stop immediately and apply a blister plaster.


